Introduction to Masonry Joints
Ever wondered how buildings withstand the trials of the weather? Or how some constructions seem immune to water?
It’s all in the masonry joints!
In this blog post, we explore the world of masonry, spotlighting various types of joints and how they contribute to the durability and aesthetic appeal of structures. We’ll guide you through the basic concept of a weather struck joint and further explain how it functions. We’ll also walk you through the benefits of using weather struck joints and how to apply them.
By the end of this blog, you’ll be familiar with weather struck joints, cut and struck pointing, flush joints, and even tuckpointing!
So, are you ready to grasp the art behind those walls that brave the storms and age with grace?
Let’s start building our knowledge – brick by brick!
Table of Contents
Understanding Weather Struck Joints in Construction

What is a Weather Struck Joint?
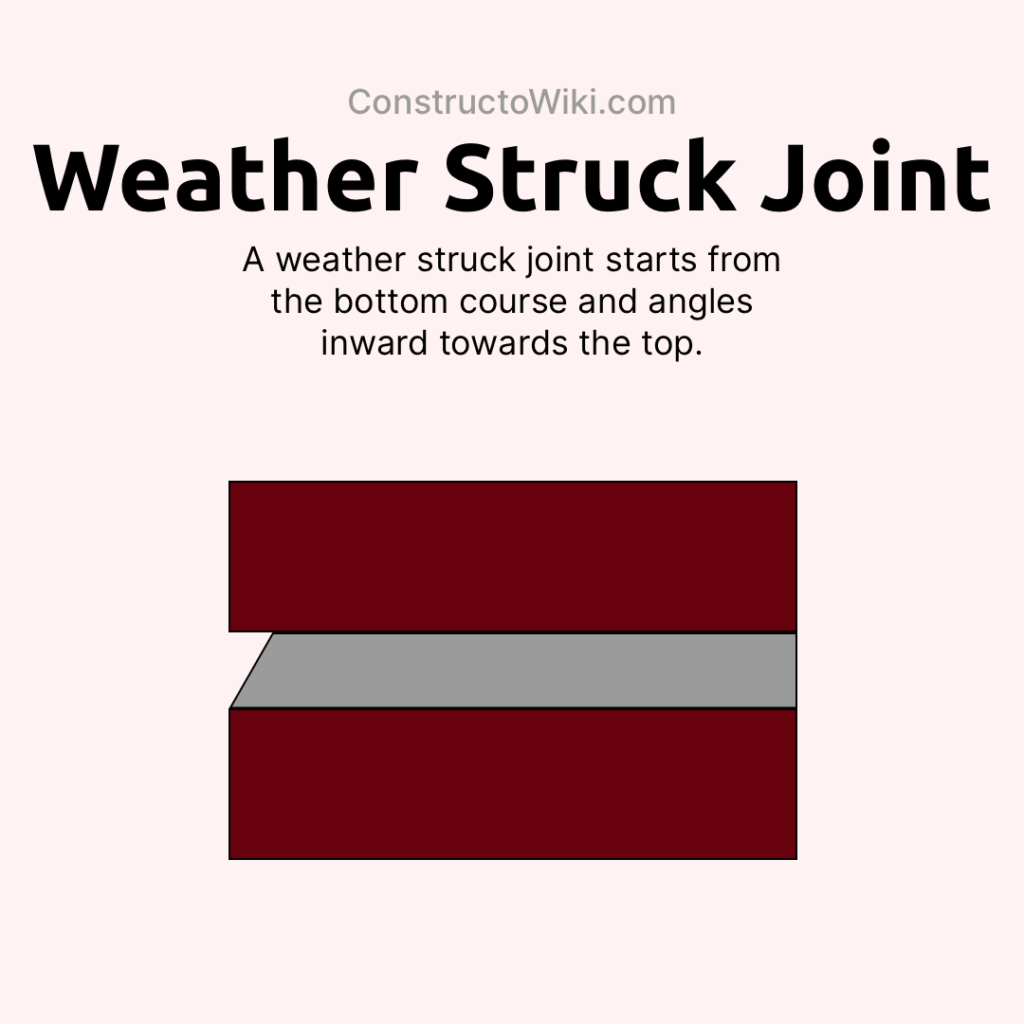
A weather struck joint is a specific type of masonry joint finish used in brickwork and stonework. The finish is designed to direct water away from the face of the wall and prevent moisture from seeping into the building. This method of jointing can enhance the durability and longevity of construction by keeping the structure dry.
How Does a Weather Struck Joint Work?
A weather struck joint is shaped in such a way that the mortar slopes downward from the top edge of the brick or stone. This sloping surface allows rainwater to runoff easily, reducing the chance of water penetration.
| Feature | Description |
|---|---|
| Sloping Surface | The mortar is applied so that it slopes downwards from the top. |
| Water Runoff | Designed to direct water away from the facade of the wall. |
Advantages of Using Weather Struck Joints
- Prevents Water Ingress: By directing water away from the wall, it minimizes moisture penetration.
- Increased Durability: Structures are less likely to suffer from water damage over time.
- Improved Aesthetics: Provides a neat and tidy appearance, enhancing the visual appeal of brick or stonework.
Application Process
Tools Needed
- Trowel
- Pointing Tool
- Brush
Step-by-Step Guide
- Prepare the Mortar: Mix the mortar to the appropriate consistency.
- Apply Mortar: Using a trowel, apply the mortar to the joint.
- Slope the Mortar: Shape the joint with a pointing tool to create a downward slope.
- Finish the Joint: Smooth the joint with a brush, ensuring the slope is well-defined.
Conclusion
Weather struck joints are an essential masonry technique that ensures water is directed away from the brick or stone surface. Not only do they enhance the durability of a structure, but they also contribute to its aesthetic appeal. For more detailed information on masonry techniques, you can refer to this Family Handyman guide.
Exploring Cut and Struck Pointing

Defining Cut and Struck Pointing
While the text has provided an exhaustive look into weather struck pointing, let’s understand about another common masonry joint finish, known as cut and struck pointing.
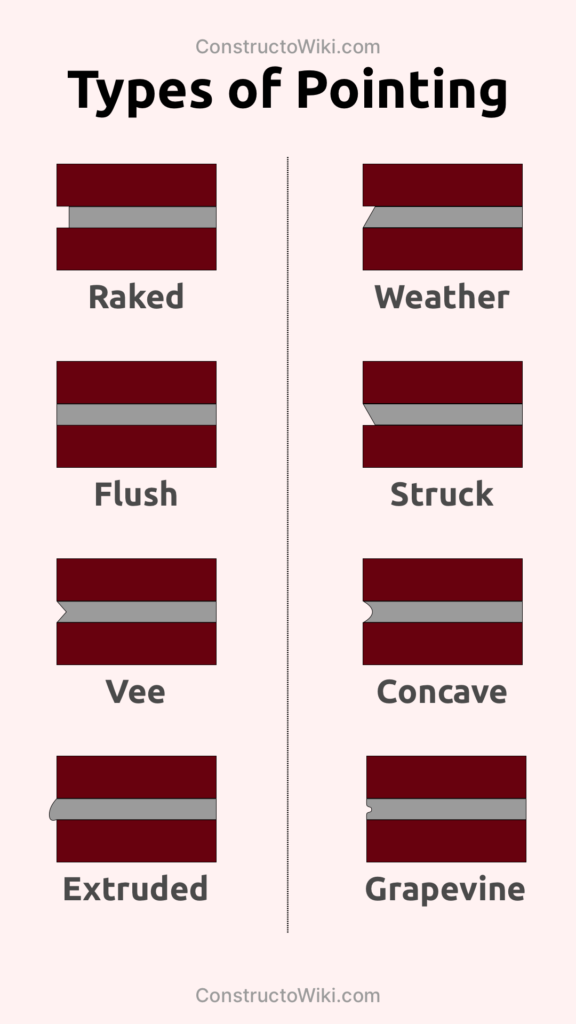
Cut and struck pointing is another grouping of masonry joint finishes, characterized by a V or U-shaped indentation in the center, formed by a pointing tool. This style of pointing, like the weather struck joint, has its unique functionality and advantages.
| Feature | Description |
|---|---|
| Unique Shape | Indentation in the center, forming a V or U shape. |
| Tool | Pointing tool is used for shaping the joint. |
How Cut and Struck Pointing Works
After the mortar has been applied to the joint between bricks or stones, a pointing tool is used to create a distinct shape, typically a V or a U.
This particular form doesn’t just add visual interest but plays a key role in preventing water ingression. The unique design effectively channels water away from the joint, reducing the risk of water damage to the structure.
Advantages of Cut and Struck Pointing
- Water Diversion: Efficient at diverting water from the joint, mitigating the chances of water ingress.
- Architectural Detail: Provides a great degree of architectural stylistic detail, enhancing the building’s character and aesthetic charm.
- Durability: Helps in long-lasting masonry work by preventing decay and water damage.
Applying Cut and Struck Pointing
Tools Required
- Trowel
- Pointing tool
How to Apply
- Mix the Mortar: Start by mixing the mortar. Ensure it has a right consistency that’s not too dry or too wet.
- Apply the Mortar: Using a trowel, apply the mortar to the joint.
- Shape the Joint: Utilize the pointing tool to shape the joint into a U or V shape.
For a more comprehensive view on cut and struck pointing, you can explore this DIY Doctor Guide.
Distinguishing Between Weather Struck and Flush Joints

What is a Flush Joint?
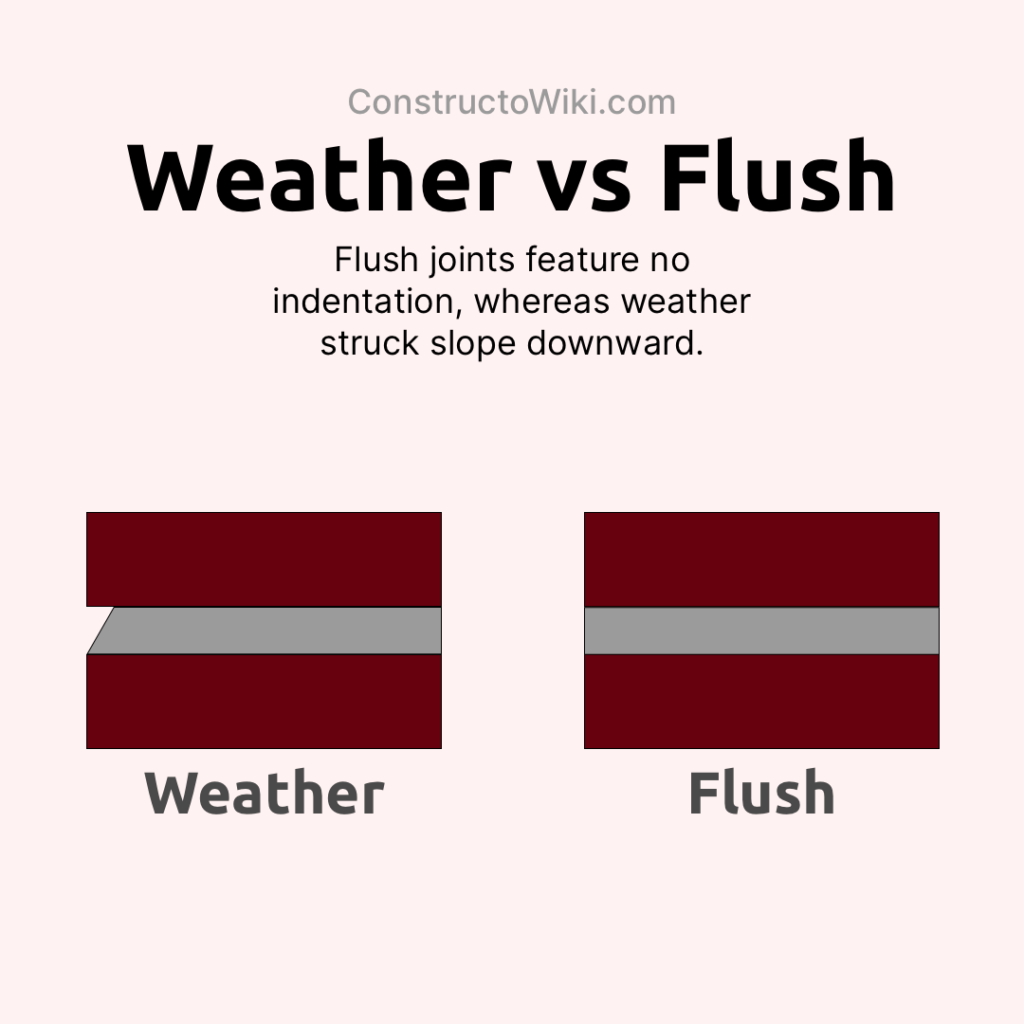
A flush joint, also known as flush pointing, is another common masonry technique used to achieve a smooth, even surface between bricks or stones. Unlike weather struck joints, flush joints do not have a sloping surface. Instead, the mortar is leveled with the face of the bricks or stones, providing a flat and tidy appearance.
How a Flush Joint Works
Flush joints involve pressing the mortar into the joint and scraping it off flush with the masonry unit’s face. This technique ensures a sleek look but does not necessarily emphasize water runoff. Therefore, it’s often used in interior settings or in exteriors where water exposure is minimal.
| Feature | Description |
|---|---|
| Smooth Surface | Mortar is leveled flush with the face of the masonry. |
| Water Runoff | No particular design to channel water away. |
Advantages of Using Flush Joints
- Clean Appearance: Provides a smooth, modern look suitable for various architectural styles.
- Easy Maintenance: Simplistic design makes it easy to clean and maintain over time.
- Efficient Application: Quicker to apply compared to other joint finishes, reducing labor time.
Application Process
Tools Needed
- Trowel
- Pointing Tool
- Scraper
Step-by-Step Guide
- Prepare the Mortar: Mix the mortar until it reaches the right consistency.
- Apply Mortar: Use a trowel to fill the joints between the bricks or stones with mortar.
- Level the Mortar: Once applied, scrape the mortar so it’s flush with the masonry’s surface using a pointing tool or scraper.
- Finishing Touch: Smooth out any irregularities to achieve a clean, flush surface.
Comparing Weather Struck and Flush Joints
| Feature | Weather Struck Joint | Flush Joint |
|---|---|---|
| Water Management | Designed to direct water away from the wall | No specific design for water runoff |
| Surface Appearance | Sloping surface | Flat, even surface |
| Best Use Case | Exteriors with high water exposure | Interiors or exteriors with minimal water contact |
| Durability | High, because it prevents water ingress | Moderate, may need additional protective measures in wet environments |
Both weather struck and flush joints serve their unique purposes in masonry work, and the choice between them depends largely on the specific requirements of the project.
Weather struck joints are particularly useful for exterior walls exposed to rain, while flush joints offer a sleek finish suitable for interior or less exposed areas. Understanding the nuances between these joint finishes can help you choose the right technique for your construction needs.
Understanding the Purpose of Tuckpointing
What is Tuckpointing?
Tuckpointing is a repair process primarily used in masonry where deteriorating or damaged mortar between the bricks or stones is replaced. This technique enhances the appearance as well as the structural integrity of the masonry work. Tuckpointing can be particularly crucial in older buildings where the mortar has worn away over time.
Main Objectives of Tuckpointing
The process of tuckpointing isn’t merely cosmetic; it serves several important functions that contribute to the longevity and stability of masonry structures.
- Structural Integrity: Replacing old, crumbling mortar helps maintain the structural soundness of the wall or building.
- Water Prevention: Properly applied mortar prevents water from seeping into the wall, thus reducing the risk of water damage and mold.
- Enhanced Aesthetics: Fresh mortar lines make the brickwork look new and well-maintained, enhancing visual appeal.
How Tuckpointing Complements Weather Struck Joints
Weather struck joints and tuckpointing often go hand-in-hand for optimal wall performance and appearance.
- Combined Durability: While weather struck joints help in directing water away, tuckpointing ensures the mortar is in good shape, reinforcing overall durability.
- Visual Consistency: Tuckpointing can replicate the original mortar color and texture, making repairs less noticeable, thereby maintaining the visual consistency of the masonry.
Tools and Materials Needed for Tuckpointing
Before beginning the tuckpointing process, make sure you have the following tools and materials ready:
- Mortar Mix
- Pointing Trowel
- Mortar Hawk
- Stiff Brush
- Masonry Chisel
- Hammer
Step-by-Step Tuckpointing Process
Below is a detailed guide on how to perform tuckpointing effectively.
- Remove Old Mortar: Use a hammer and chisel to carefully remove the deteriorated mortar from the joints.
- Clean the Joints: Brush out any dust and debris from the joints to ensure the new mortar adheres properly.
- Prepare the Mortar: Mix the mortar according to the manufacturer’s instructions until it reaches the right consistency.
- Apply the Mortar: Using a mortar hawk and pointing trowel, fill the cleaned joints with fresh mortar, ensuring it adheres well to the bricks or stones.
- Tool the Joints: Shape the mortar to match the original profile using a pointing tool, making sure it’s even and neatly installed.
- Final Touches: Allow the mortar to set slightly, then brush away any excess for a clean finish.
In essence, tuckpointing is an indispensable maintenance technique that not only preserves the structural integrity of masonry but also enhances its aesthetic appeal. Understanding the purpose and process of tuckpointing will ensure your masonry work stands the test of time.
Conclusion: Key Distinctions within Masonry Techniques
Within masonry, the type of joint finish used is critical to both the durability and aesthetic appeal of the structure. This article discussed various joint finishes like weather struck, cut and struck, and flush, each with its unique features, functionalities, and application processes.
While weather struck joints are particularly effective in exteriors with high water exposure due to their design to channel water away, cut and struck pointing adds architectural detail while also preventing water ingression. Flush joints, on the other hand, are notable for their smooth, modern look and usage in environments with minimal water contact.
Besides these, it discussed an important masonry repair process known as tuckpointing, which serves to replace damaged mortar, enhancing the structural integrity and appearance of masonry work. Understanding these techniques can help make more informed decisions when undertaking masonry projects.
Frequently Asked Questions – FAQs
What are weather struck joints used for in masonry?
Weather struck joints are used to direct water away from the face of the wall and prevent moisture from reaching the building structure. They enhance the durability of construction by keeping the structure dry, especially in areas with high water exposure.
What is the difference between weather struck and flush joints?
Weather struck joints feature a sloping surface designed to channel water away from the wall, making them ideal for exteriors with high water exposure. Flush joints, on the other hand, are designed with a flat surface and are typically used in interiors or exteriors where water exposure is minimal.
What is cut and struck pointing?
Cut and struck pointing is a masonry joint finish with a V or U-shaped indentation formed by a pointing tool. It not only adds visual interest but helps prevent water ingression by effectively channeling water away from the joint.
What is tuckpointing in masonry?
Tuckpointing is a repair process in masonry where old or damaged mortar between bricks or stones is replaced. This preserves the structural integrity and enhances the appearance of the masonry work. It is particularly crucial in older buildings where the mortar has worn away over time.


